I. Love. Material for MkDocs!
I’ve been using the MkDocs - Material for MkDocs combination in every. single. place. I worked in, to document things. And everyone loves it. Recently I had to share some of my notes with my colleagues and realized we are oceans apart. So I put it on a VM and shared. Nothing fancy. I had a shell script involving a bit of rsync to deploy the site. It never felt archaic until my work suddenly involved public cloud.
It’s just a static site. I should be writing docs and pushing it to the git repo. The rest is for the machines to do! So I got the machines to do it for me. Following is one way of doing it.
I’ll be using Google Cloud Platform (GCP) because that’s what I’m most familiar with these days. The plan is to push the content in git to a Google Source Repositories (GCR) repo, have Google Cloud Build build it using a container in Google Container Registry (GCR) as a buildstep and push the site in to a Google Cloud Storage (GCS) bucket.
I use Coloudflare for DNS and their http(s) proxy because it’s free, awesome and provides free https.
And the whole thing is (mostly) automated with Terraform!
Check the following diagram1, because we all love nice diagrams.
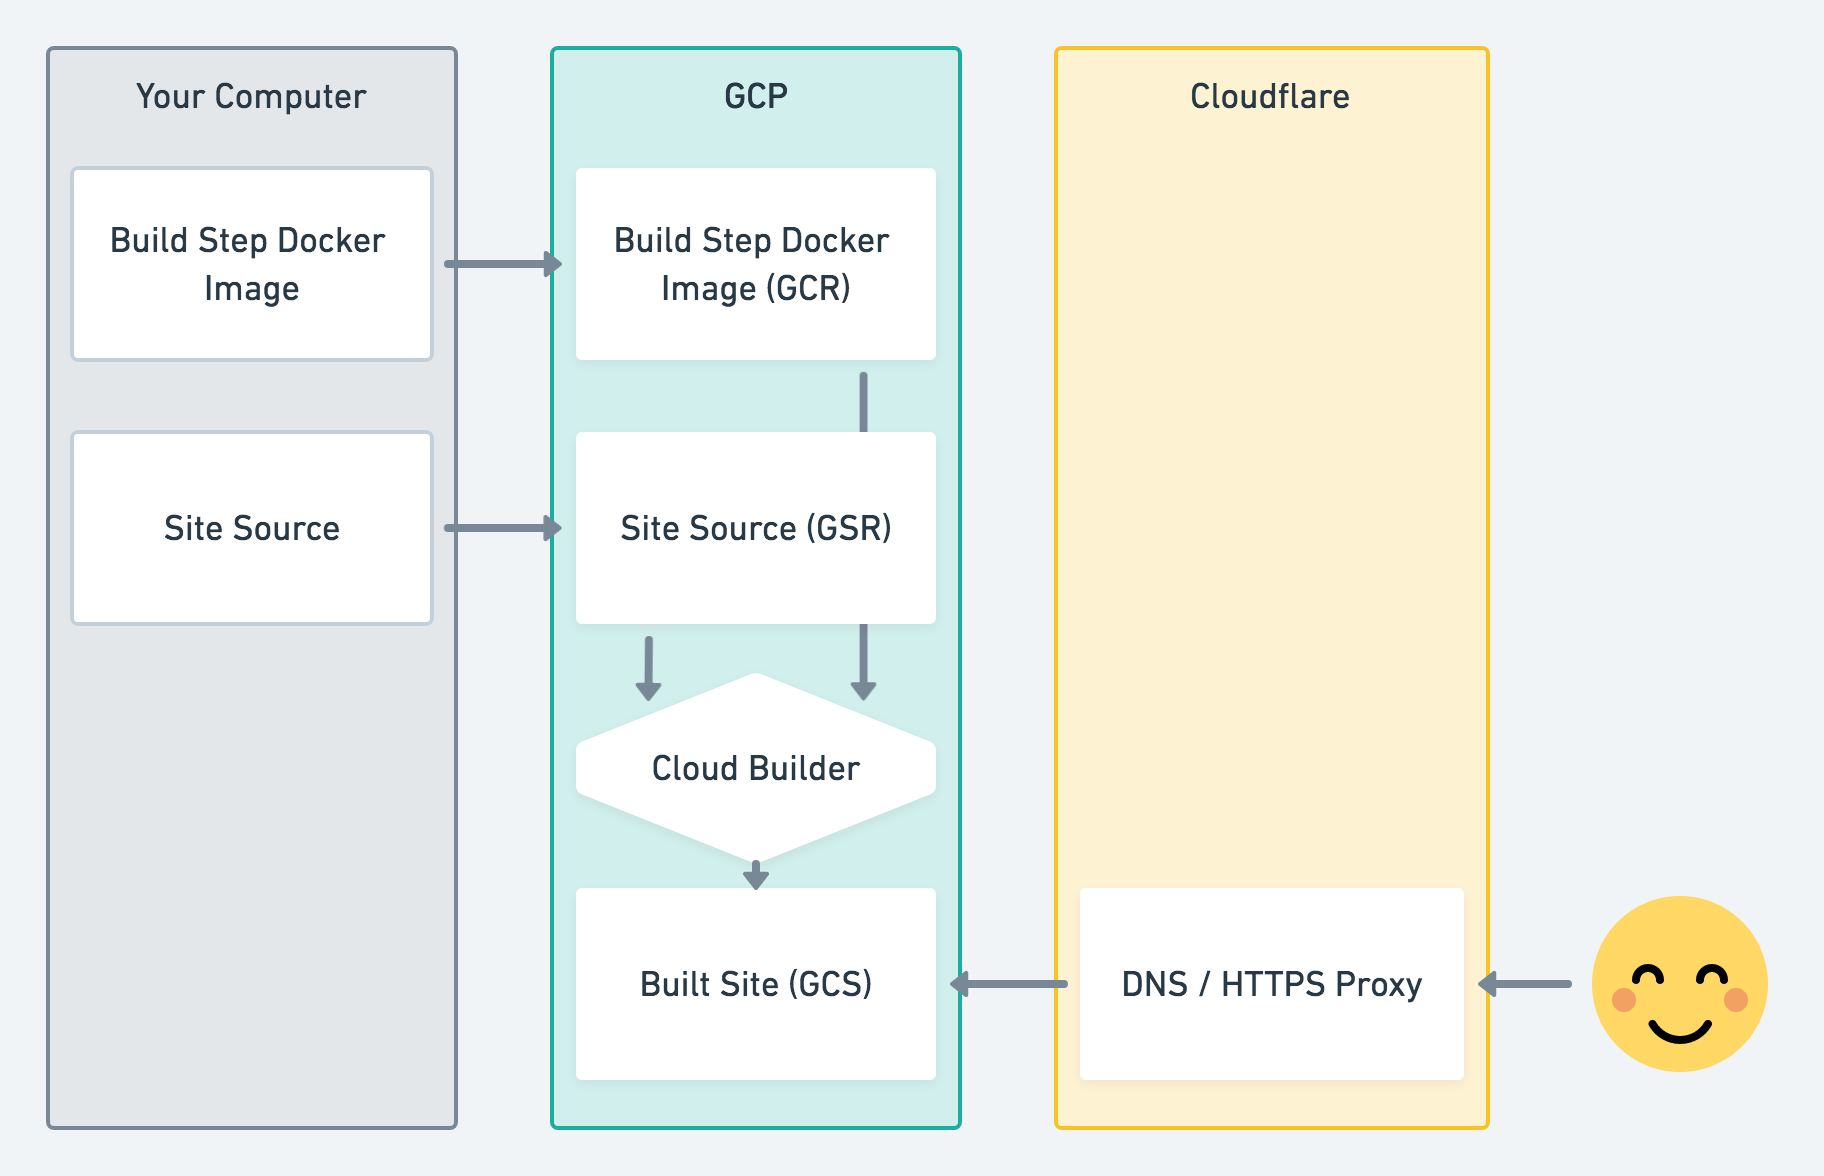
The Terraform configuration I use is in this github repo alongside the site content for my notes site notes.chanux.me. To continue, you need to know the basics of Terraform. Don’t worry, my notes site has got you covered.
First of all, we need to prove ownership of the domain to Google so that we can create GCS bucket to store the site content.
Go to Google Site Ownership Verification
page Use ADD
PROPERTY button to add your domain. Select the DNS based verification
option and find the random string provided as
google-site-verification=<random_string>. Then update the Terraform variable
google_site_verification with that.
Run Terraform as follows
terraform plan -target=module.dns -out=tfplan.out
terraform apply tfplan.out
This will create the subdomain you chose for your site and add DNS TXT record required for Google site ownership verification. Go back to the Google Site Ownership site and have the ownership verified (Give some time for DNS to propagate).
Once the ownership is verified, add the email of your GCP Service Account created for Terraform access under Verification details section for your domain in Webmaster Central. This allows creating the GCS bucket with Terraform. Also, enable following APIs in GCP for smooth Terraform execution.
Now run the rest of Terraform which will create the GCS bucket to store site content, Google Source Repository to store source and the build trigger to build the site when we push to the source repo.
The build trigger would need a build step ready to use to build the site with. For this we’ll push squidfunk/mkdocs-material in Google Container Registry to use it as a build step.
docker pull squidfunk/mkdocs-material
docker tag squidfunk/mkdocs-material asia.gcr.io/<gcp-project-id>/mkdocs-material
If you haven’t done already, to be able to push container registry, you need to configure docker to use gcloud as credential helper.
gcloud auth configure-docker
Now you should be good to push
docker push asia.gcr.io/<gcp-project-id>/mkdocs-material
Now it’s all ready to push code and hopefully have the site built and deployed. Assuming we have our docs secure in git repository, we need to push the code to Google Source Repository. Just make sure that you have configured git to access Google Source Repositories.
git remote add google https://source.developers.google.com/p/<gcp-project-id>/r/<cloud-sourc-repository-name>
git push -u google master
Just visit the domain name you chose for your site and it should be ready in a minute :D
The magic here is the build trigger we setup with Terraform, which will trigger
the build. It will use the cloudbuild.yaml file in our source repo to know
what to do. It consists of two build steps.
steps:
    - name: 'asia.gcr.io/$PROJECT_ID/mkdocs-material'
      args: ['build']
    - name: 'gcr.io/cloud-builders/gsutil'
      args: ['cp', '-r', 'site/*', 'gs://$_GCS_BUCKET_NAME/']
The first build step is basically the mkdoc-material docker image we pulled
from docker hub and pushed to GCR. Google cloud build will basically launch
a container with that image mounting workspace, which is the root of our
source repo and run build. mkdocs-material will use the content from docs
directory and the mkdocs.yml file and build the site into site directory,
which will be in the workspace.
The second build step, the gsutil container provided by GCP team will copy
over the content at site directory in to the GCS bucket we created with
Terraform. If you noticed the variable _GCS_BUCKET_NAME, that’s an
environment variable set when configuring the build trigger.